This is the first of two posts. This post covers a somewhat detailed tutorial on using Docker as a replacement for Vagrant when developing a Node app using the Express framework. To make things a bit non-trivial, the app will persist session information in Redis using the connect-redis middleware. The second post will cover productionizing this development setup.
The Node App
The app consists of a package.json, server.js and a .gitignore file, which is about as simple as it gets.
1
| |
1 2 3 4 5 6 7 8 9 10 11 | |
1 2 3 4 5 6 7 8 9 10 11 12 13 14 15 16 17 18 19 20 21 22 23 24 25 26 27 28 29 30 | |
server.js pulls in all the dependencies and starts an express app. The express app is configured to store session information in Redis and exposes a single endpoint that returns a status message as JSON. Pretty standard stuff.
One thing to note here is that the connection information for redis can be overridden using environment variables – this will be useful later on when moving from dev to prod.
The Dockerfile
For development, we’ll have redis and node running in the same container. To make this happen, we’ll use a Dockerfile to configure the container.
1 2 3 4 5 6 7 8 9 10 11 12 13 14 15 16 17 18 19 20 21 22 | |
Taking it line by line,
1
| |
This tells docker to use the dockerfile/ubuntu image provided by Docker Inc. as the base image for the build.
1 2 | |
The base image contains absolutely nothing- so we need to apt-get everything needed for our app to run. This statement installs python and redis-server. Redis server is required because we’ll be storing session info in it and python is required by npm to be able to build the C-extension used by the redis node module.
1 2 3 4 5 6 7 8 | |
This downloads and extracts the 64-bit NodeJS binaries.
1
| |
This tells docker to cd /src once the container has started, before executing what’s specified in the CMD property.
1
| |
Launch /bin/bash as a final step.
Build and run the container
Now that the docker file is written, let’s build a Docker image.
1
| |
Once the image done building, we can launch a container using:
1 2 3 4 | |
Let’s see what’s going on in the docker run command.
-i starts the container in interactive mode (versus -d for detached mode). This means the container will exit once the interactive sessions is over.
-t allocates a pseudo-tty.
--rm removes the container and its filesystem on exit.
-p 3000:3000 forwards port 3000 on to the host to port 3000 on the container.
1
| |
This mounts the current working directory in the host (i.e. our project files) to /src inside the container. We mount the current folder as a volume rather than using the ADD command in the Dockerfile so that any changes we make to the files in a text editor will be seen by the container right away.
sqldump/docker-dev:0.1 the name and version of the docker image to run – this is the same one we used when building the docker image.
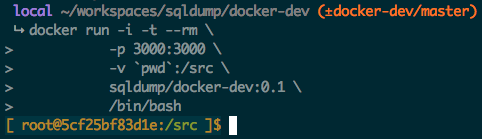
Since the Dockerfile specifies CMD ["/bin/bash"], we’re dropped into a bash shell once the container has started. If the docker run command succeeds, it’ll look something like this:
Start Developing
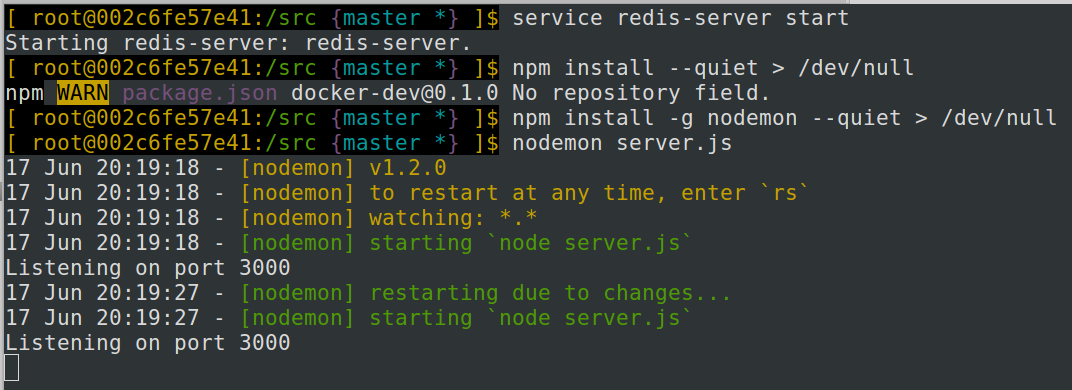
Now that the container is running, we’ll need to get a few standard, non-docker related things sorted out before we can start writing code. First, start redis server inside the container using:
1
| |
Then, install project dependencies and nodemon. Nodemon watches for changes in project files and restarts the server as needed.
1 2 | |
Finally, start up the server using:
1
| |
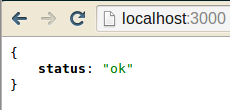
Now, if you go to http://localhost:3000 in your browser, you should see something like this:
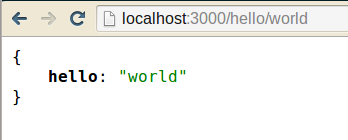
Let’s add another endpoint to server.js to simulate development workflow:
1 2 3 4 5 | |
You should see that nodemon has detected your changes and restarted the server:
And now, if you point your browser to http://localhost:3000/hello/world, you should see the response:
Production
The container, in its current state, is nowehere near production-ready. The data in redis won’t be persisted across container restarts, i.e. if you restart the container, you’ll have effectively blown away all your session data. The same thing will happen if you destroy the container and start a new one. Presumably, this is not what you want. I’ll cover production setup in part II.